Quickstart
This guide outlines the basic process of using Amoro, allowing you to quickly experience its core features. You can choose to use either the Iceberg Format or the Mixed-Iceberg Format to complete the entire process.
If you are more interested in the Mixed-Hive Format or the Paimon Format, you can refer to: Mixed-Hive Format and Paimon Format. For specific information on the different formats supported by Amoro, please refer to: Table Format.
Before starting the quick demo, some steps are required to prepare the environment. The fastest way to get started is to use a docker-compose file that uses the apache/amoro image. To use this, you’ll need to install the Docker CLI as well as the Docker Compose CLI.
Once you have those, save the yaml below into a file named docker-compose.yml:
version: "3"
services:
  minio:
    image: minio/minio
    container_name: minio
    environment:
      - MINIO_ROOT_USER=admin
      - MINIO_ROOT_PASSWORD=password
      - MINIO_DOMAIN=minio
    networks:
      amoro_network:
        aliases:
          - warehouse.minio
    ports:
      - 9001:9001
      - 9000:9000
    command: [ "server", "/data", "--console-address", ":9001" ]
  mc:
    depends_on:
      - minio
    image: minio/mc
    container_name: mc
    networks:
      amoro_network:
    environment:
      - AWS_ACCESS_KEY_ID=admin
      - AWS_SECRET_ACCESS_KEY=password
      - AWS_REGION=us-east-1
    entrypoint: >
      /bin/sh -c "
      until (/usr/bin/mc alias set minio http://minio:9000 admin password) do echo '...waiting...' && sleep 1; done;
      /usr/bin/mc rm -r --force minio/warehouse;
      /usr/bin/mc mb minio/warehouse;
      /usr/bin/mc anonymous set public minio/warehouse;
      tail -f /dev/null
      "
  amoro:
    image: apache/amoro
    container_name: amoro
    ports:
      - 8081:8081
      - 1630:1630
      - 1260:1260
    environment:
      - JVM_XMS=1024
    networks:
      amoro_network:
    volumes:
      - ./amoro:/tmp/warehouse
    command: ["/entrypoint.sh", "ams"]
    tty: true
    stdin_open: true

networks:
  amoro_network:
    driver: bridge
Next, start up the docker containers with this command:
docker-compose up
Prepare steps
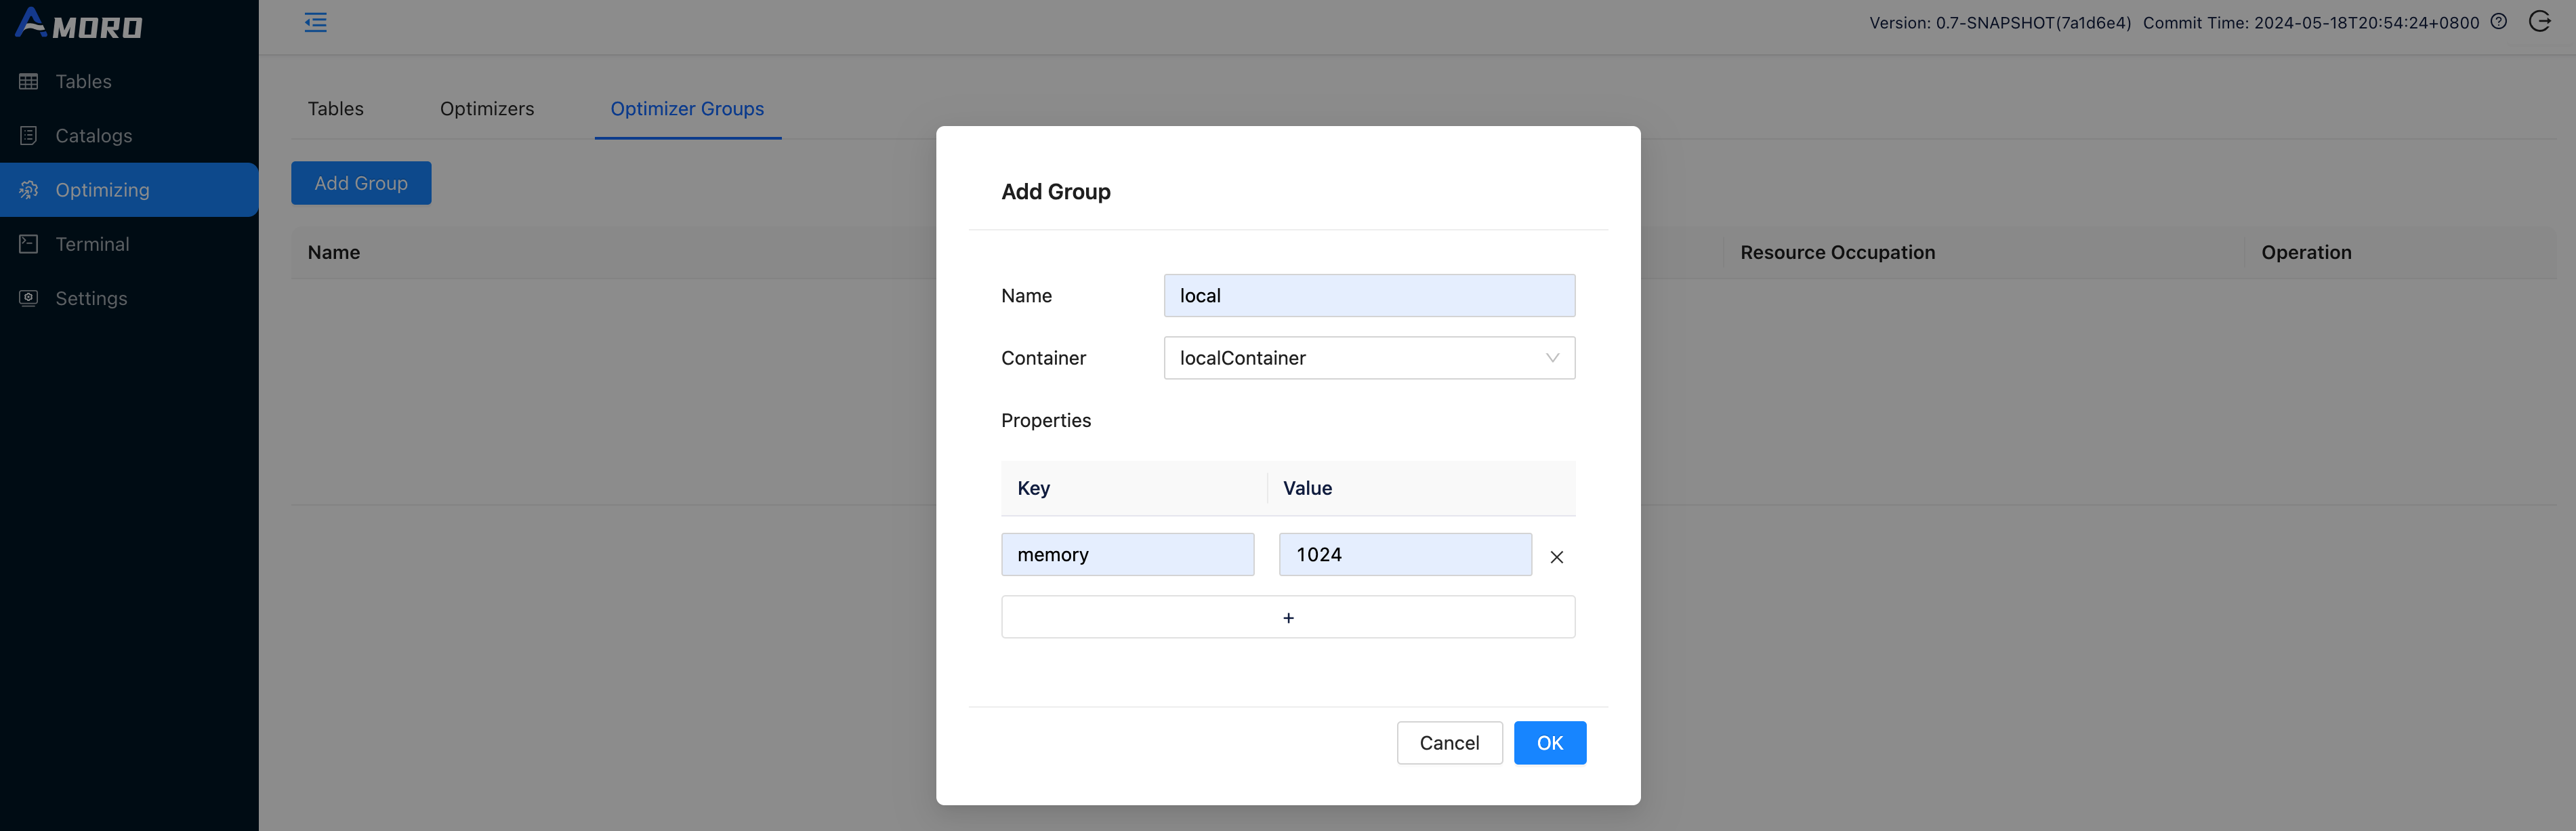
Create optimizer group
Open http://localhost:1630 in a browser, enter admin/admin to log in to the dashboard.
Click on Optimizing in the sidebar, choose Optimizer Groups and click Add Group button to create a new group befre creating catalog:
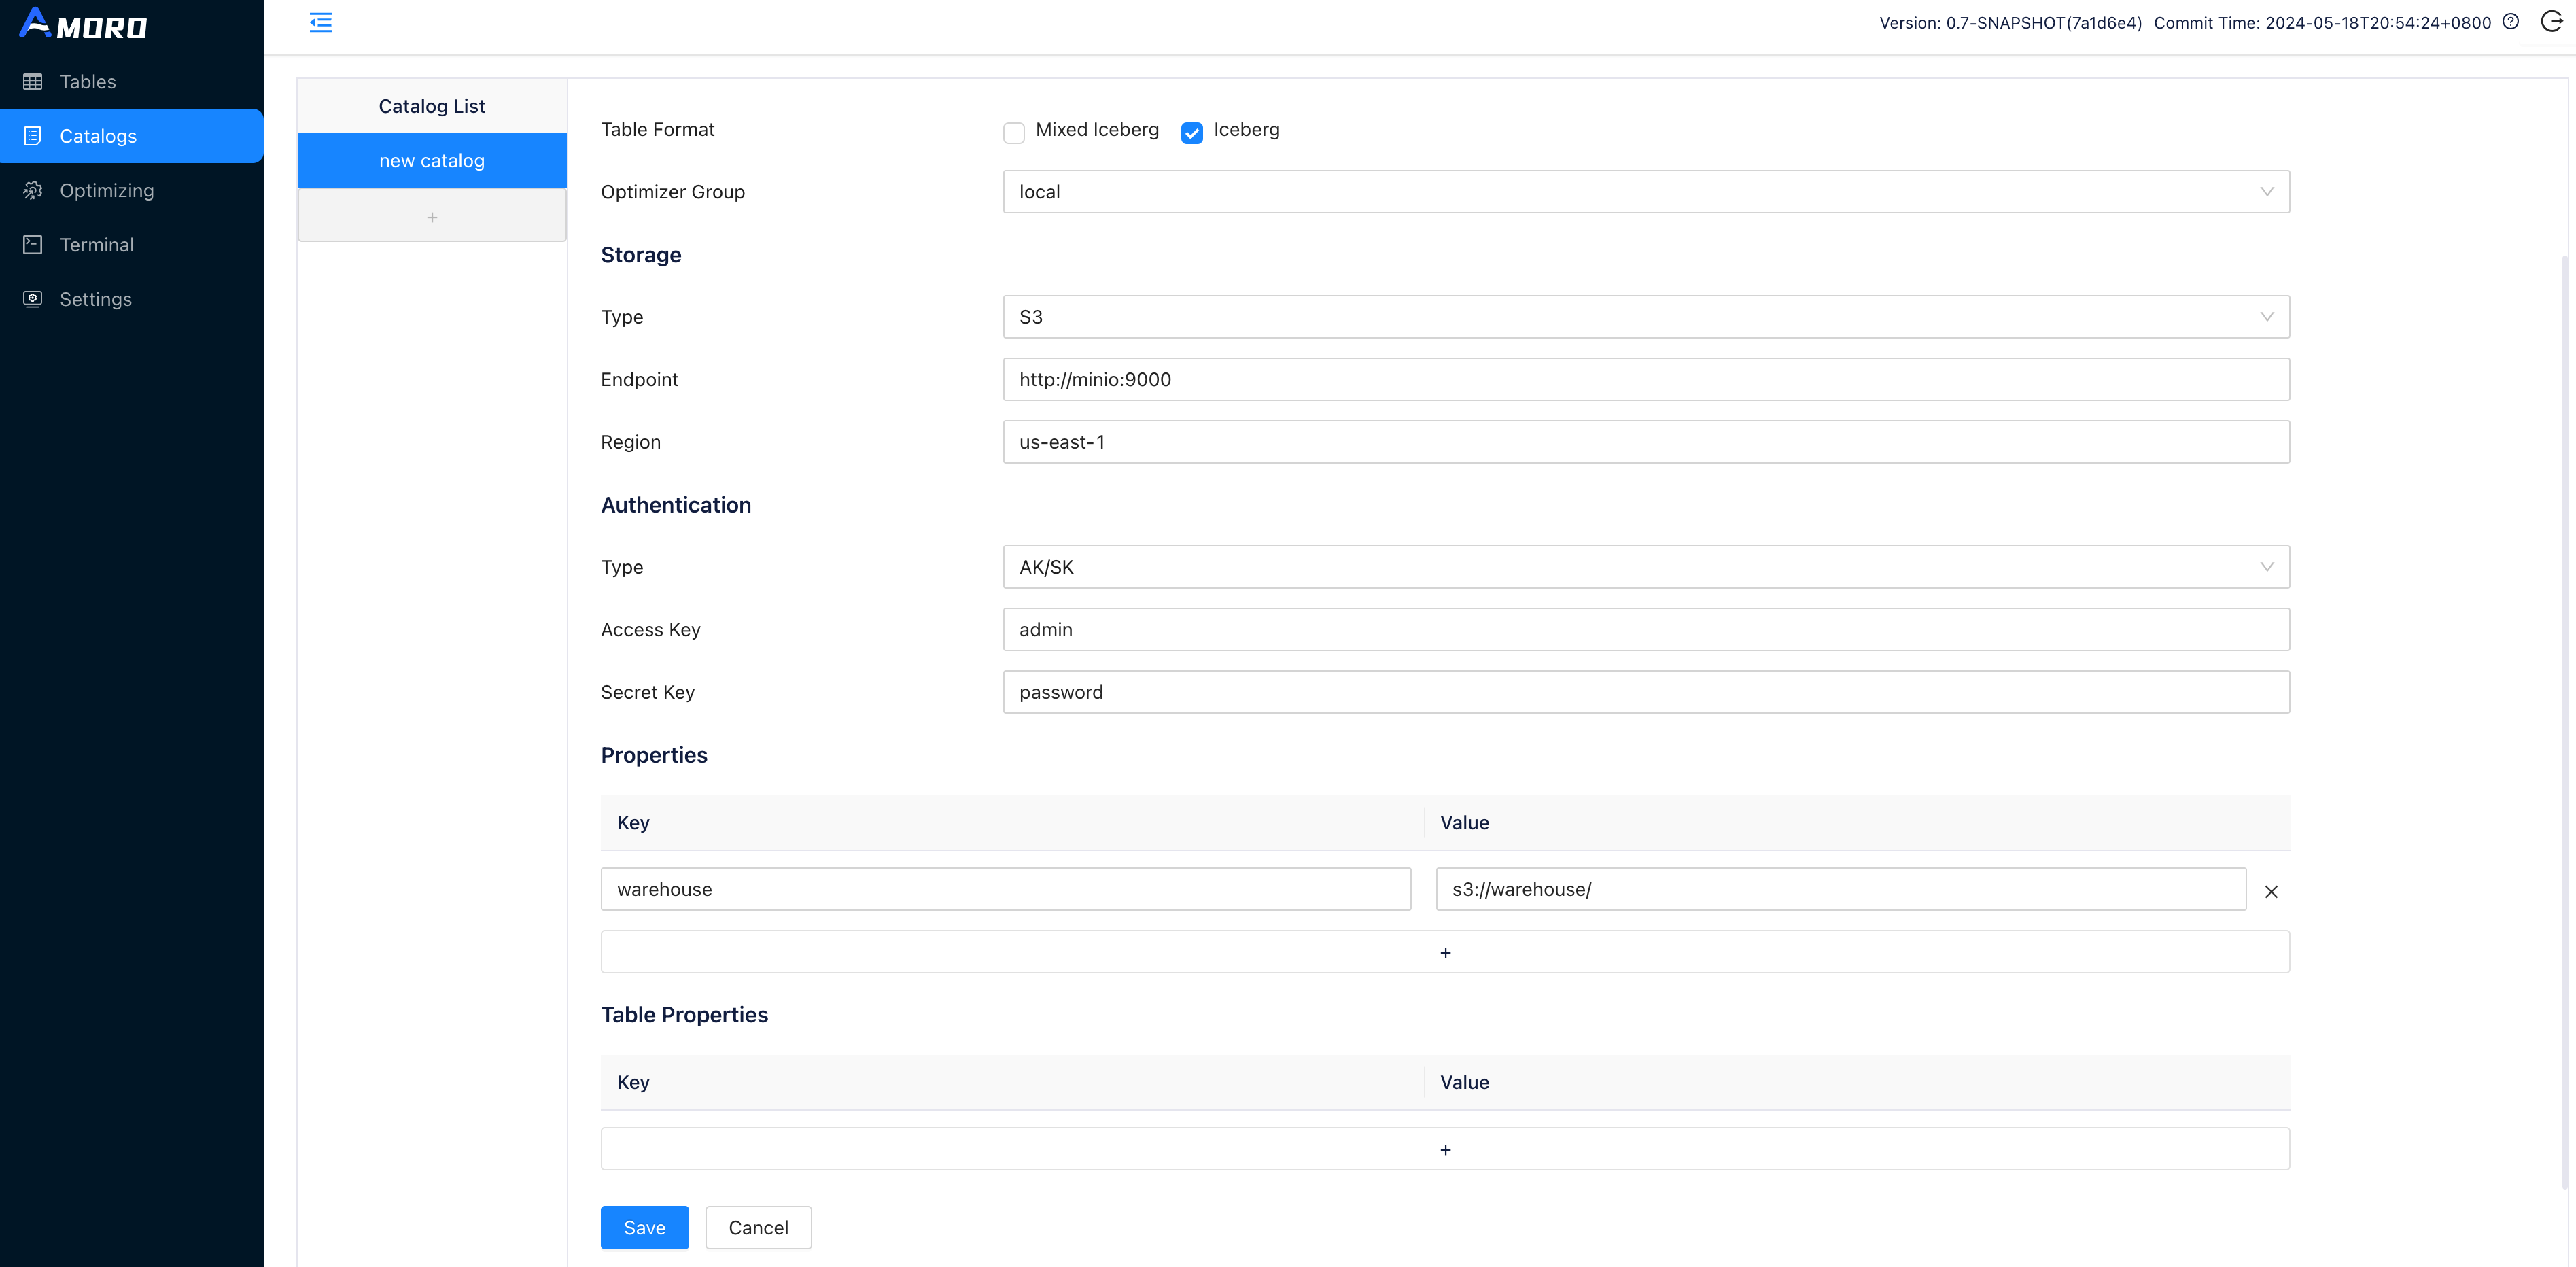
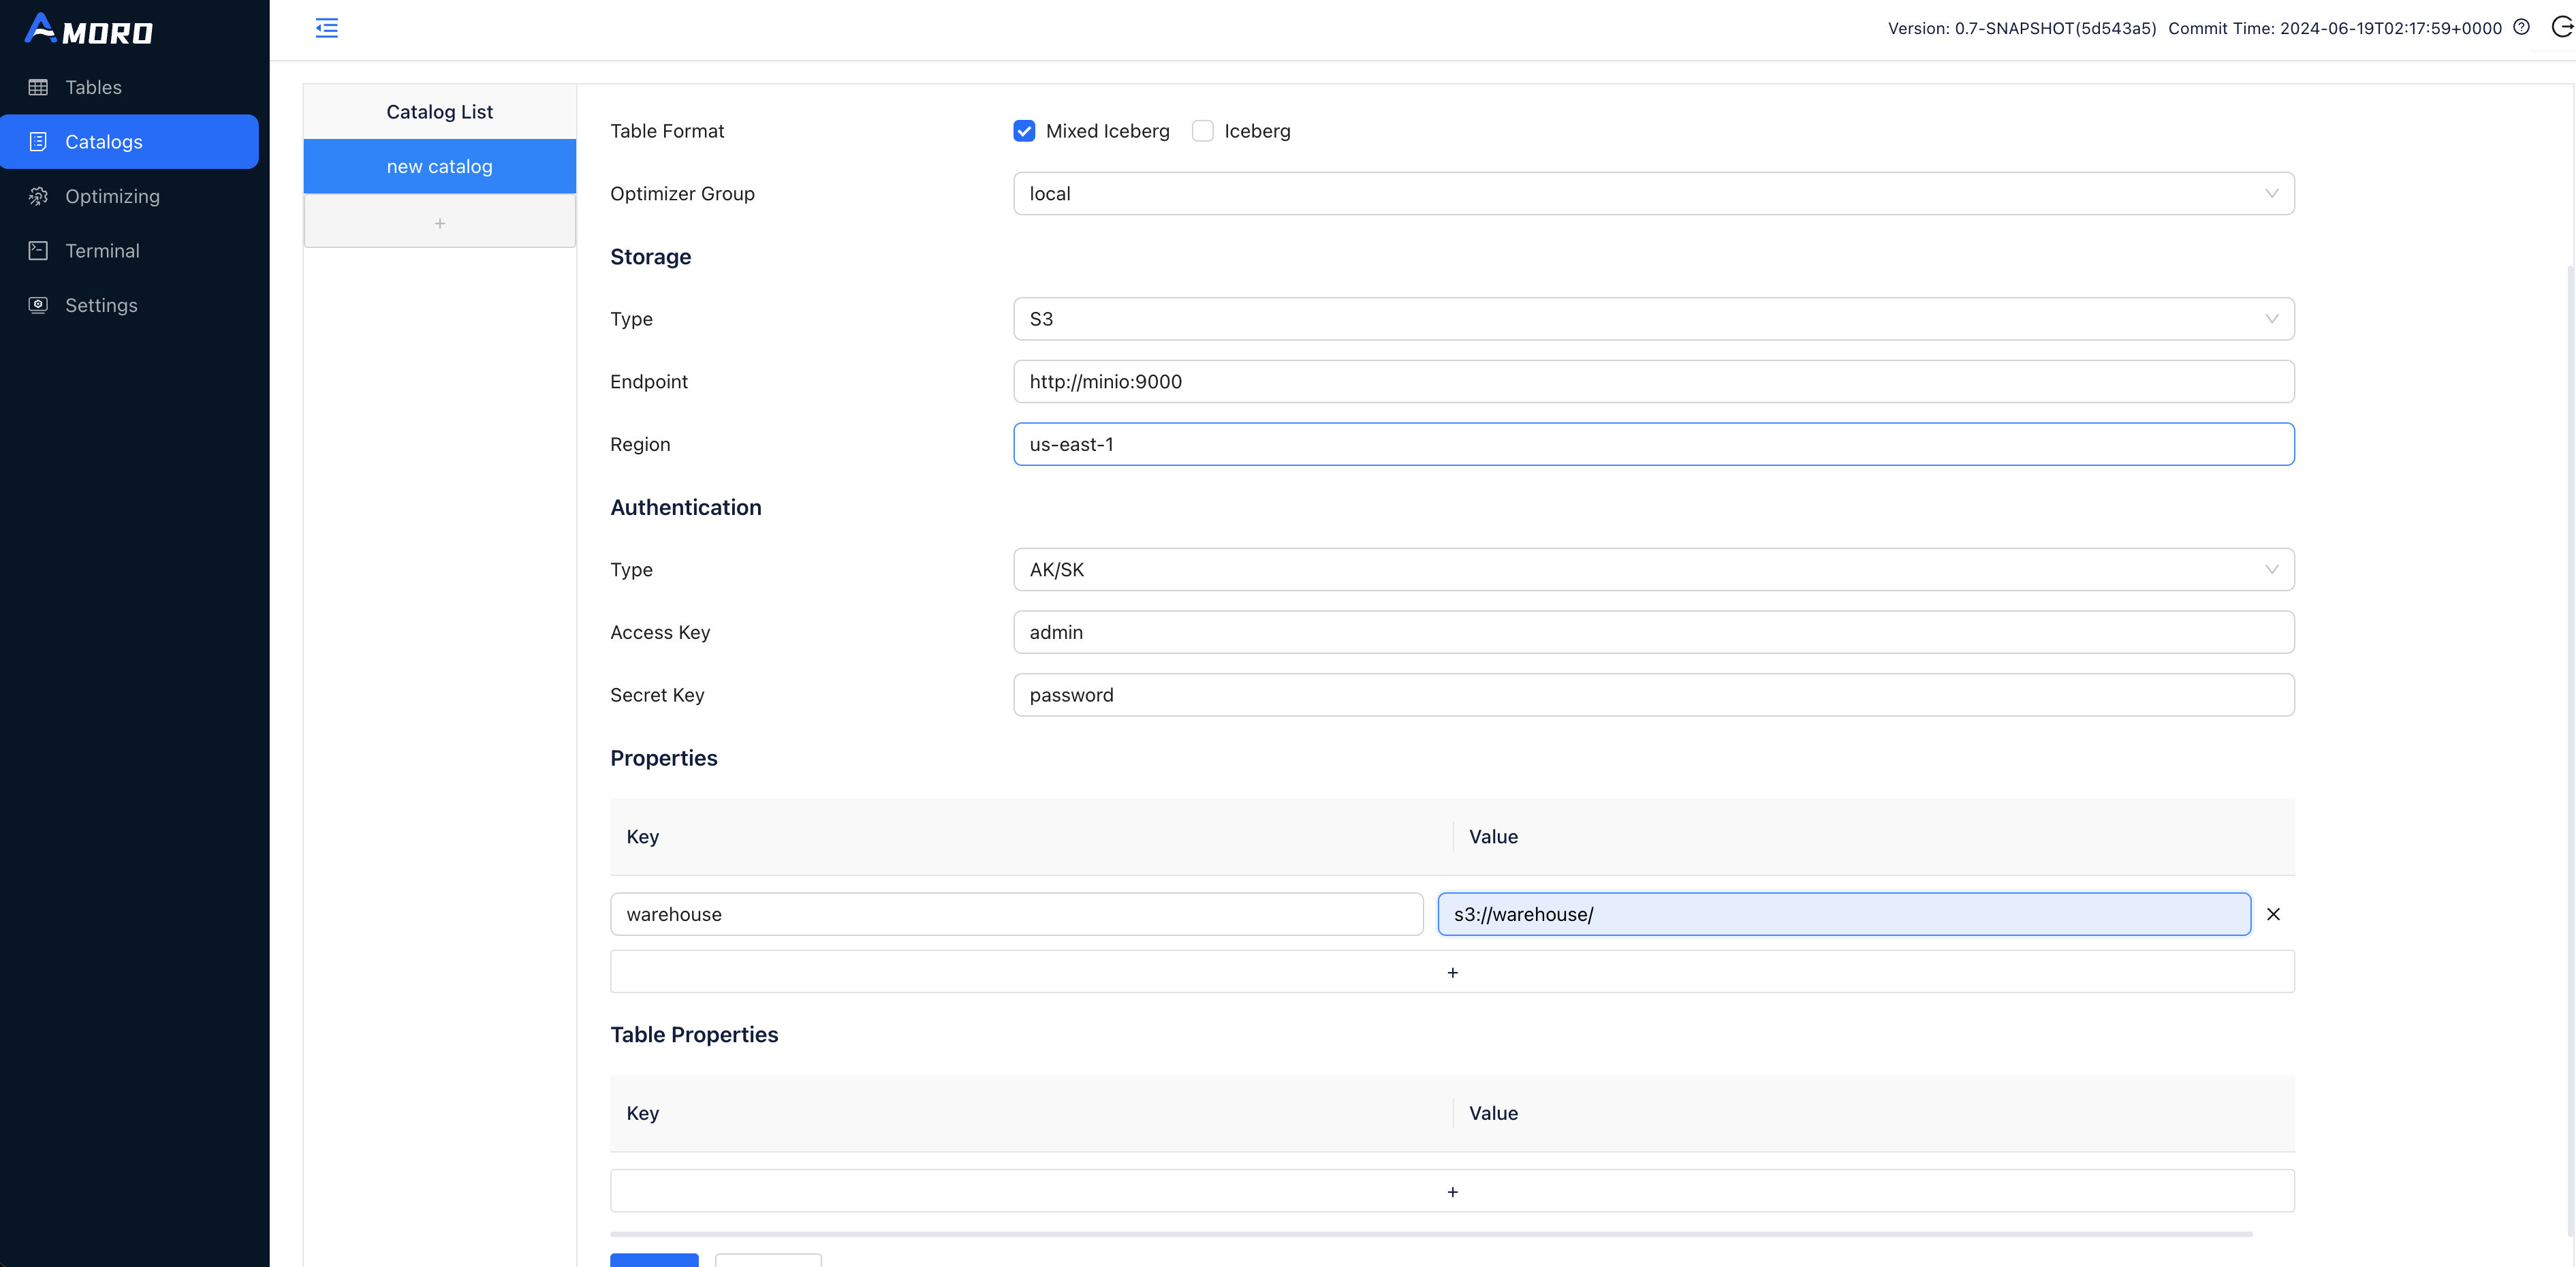
Create catalog
Click on Catalogs in the sidebar, click on the + button under Catalog List to create a test catalog, and name it to demo_catalog:
To use the Iceberg Format, select Type as Internal Catalog, and choose Iceberg as Table Format.
To use the Mixed-Iceberg Format, select Type as Internal Catalog, and choose Mixed-Iceberg as Table Format.
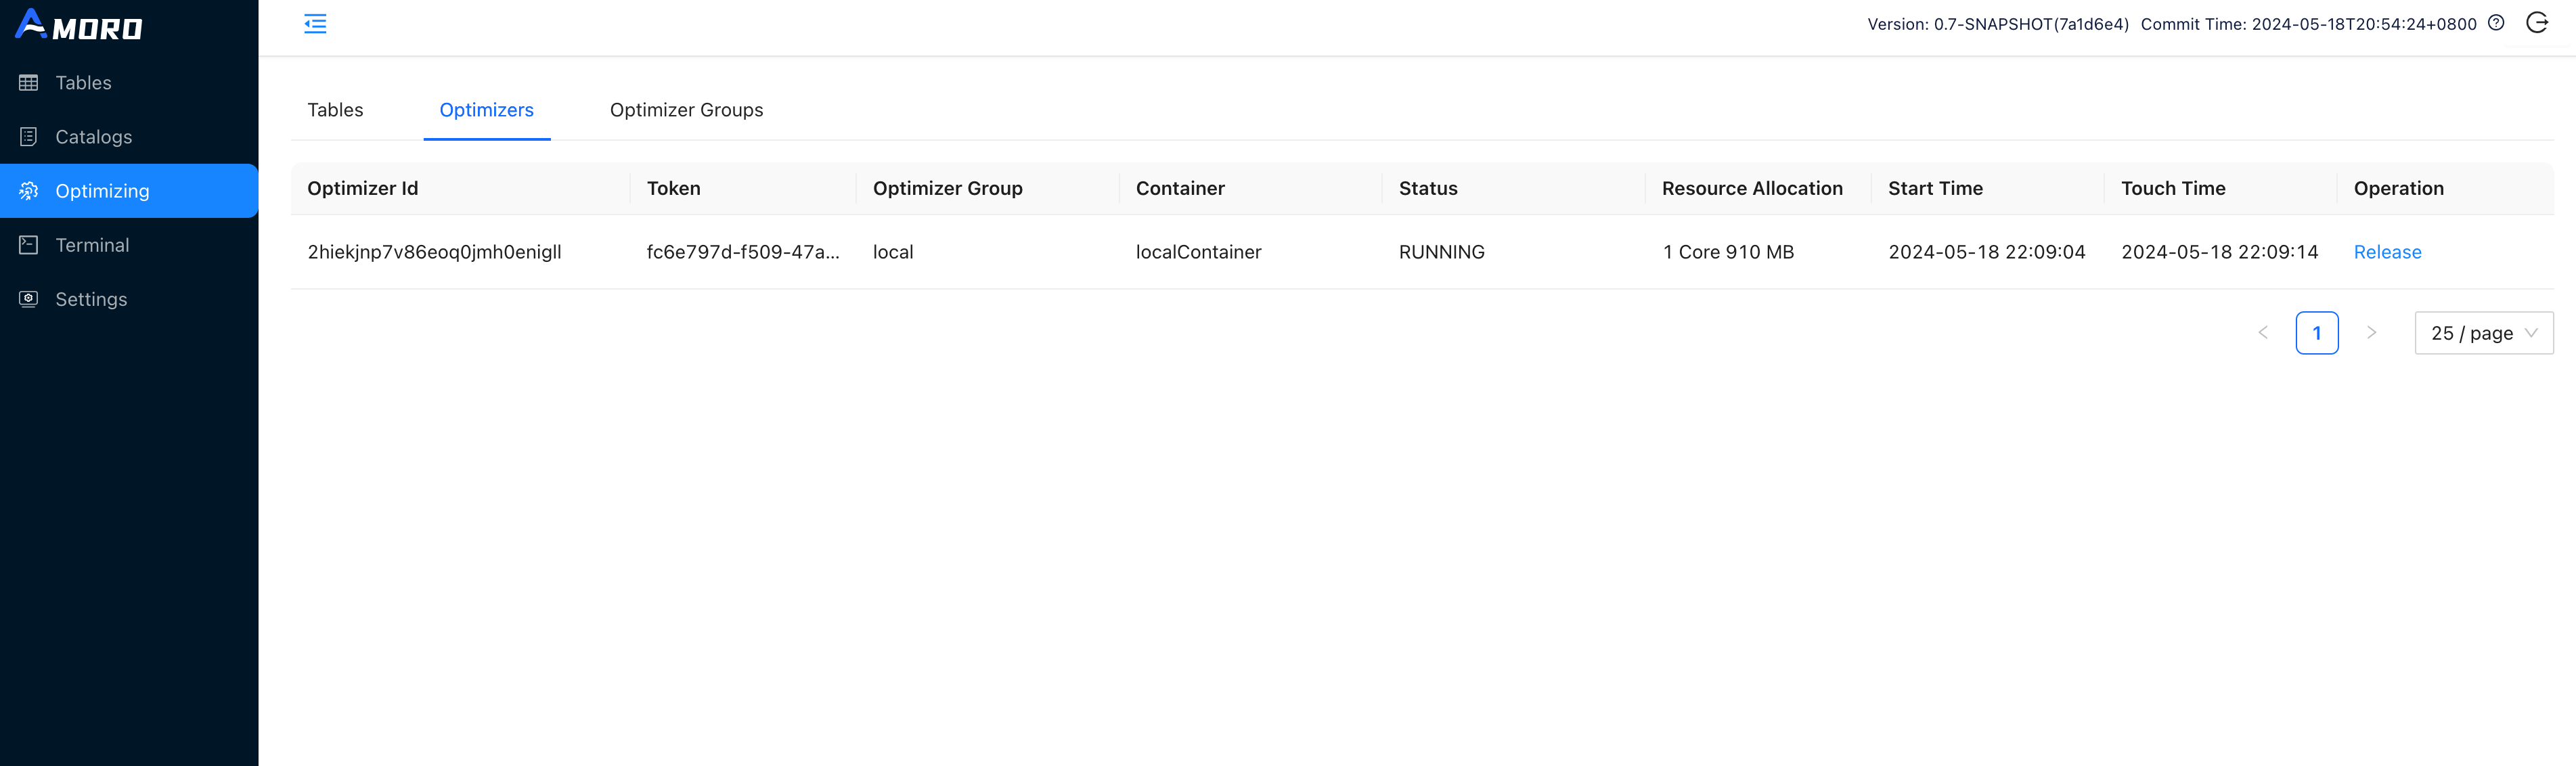
Start optimizers
Click on Optimizing in the sidebar, select the Optimizers tab, and click the Create Optimizer button.
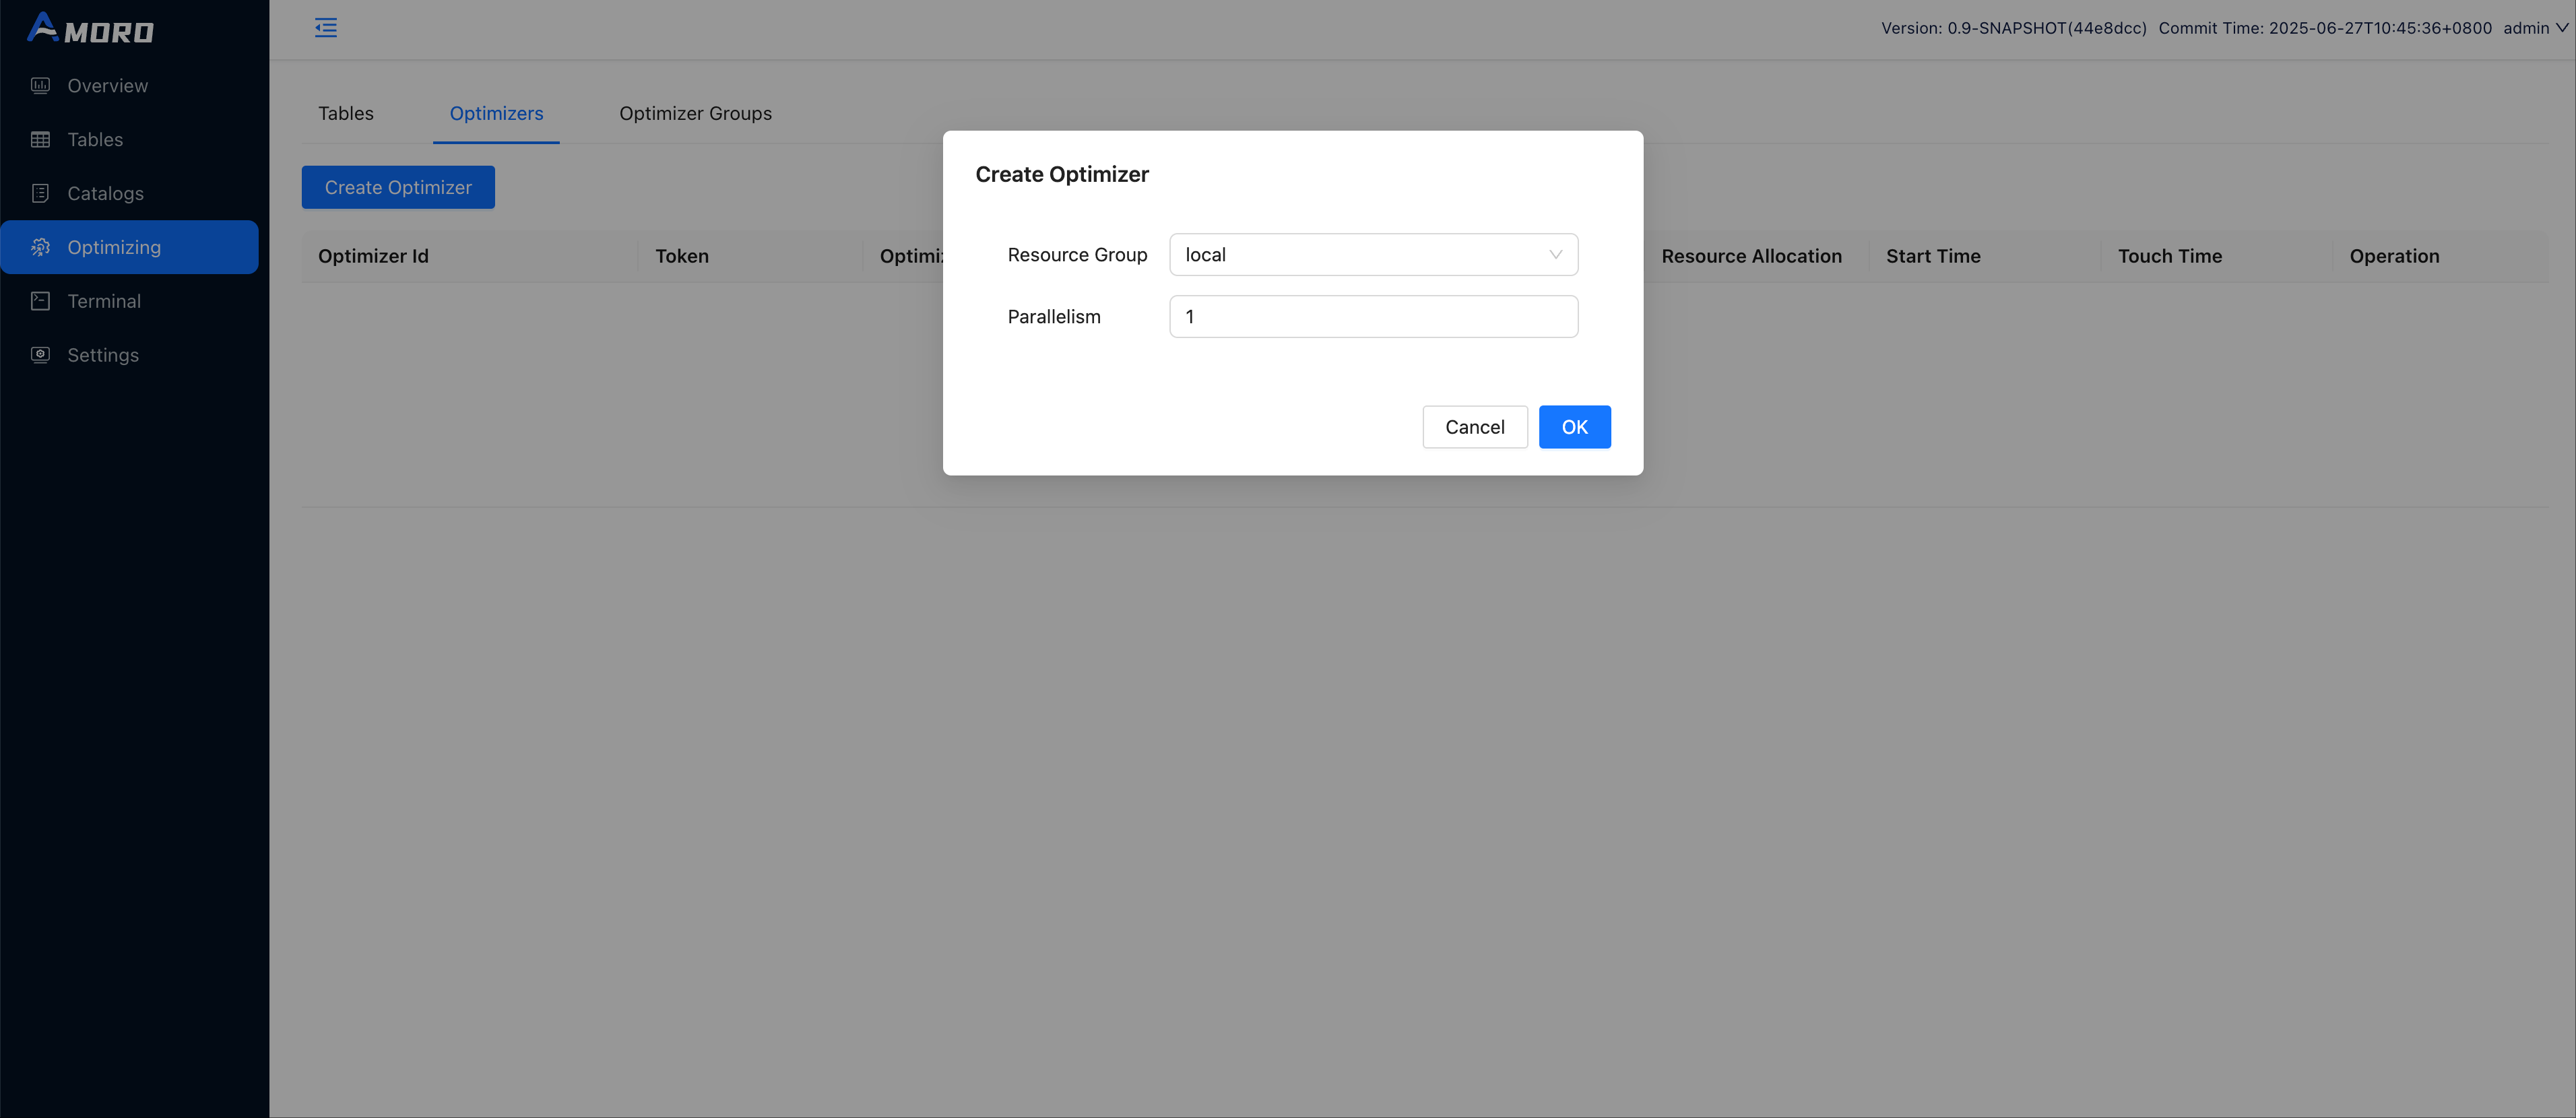
Choose the local resource group and set the concurrency of the optimizer to 1 and click OK.
You may need to wait a few seconds and try refreshing the page, you will find the newly launched optimizer here.
Demo steps
Initialize tables
Click on Terminal in the sidebar, you can create the test tables here using SQL. Terminal supports executing Spark SQL statements for now.
CREATE DATABASE IF NOT EXISTS db;
CREATE TABLE IF NOT EXISTS db.user (
    id INT,
    name string,
    ts TIMESTAMP
) USING iceberg
PARTITIONED BY (days(ts));

INSERT OVERWRITE db.user VALUES
(1, "eric", timestamp("2022-07-01 12:32:00")),
(2, "frank", timestamp("2022-07-02 09:11:00")),
(3, "lee", timestamp("2022-07-02 10:11:00"));

SELECT * FROM db.user;
CREATE DATABASE IF NOT EXISTS db;
CREATE TABLE IF NOT EXISTS db.user (
    id INT,
    name string,
    ts TIMESTAMP,
    PRIMARY KEY(id)
) USING mixed_iceberg
PARTITIONED BY (days(ts));

INSERT OVERWRITE db.user VALUES
(1, "eric", timestamp("2022-07-01 12:32:00")),
(2, "frank", timestamp("2022-07-02 09:11:00")),
(3, "lee", timestamp("2022-07-02 10:11:00"));

SELECT * FROM db.user;
Click on the RUN button uppon the SQL editor, and wait for the SQL query to finish executing. You can then see the query results under the SQL editor.
Make some changes
Execute the following SQL statements one by one in the Terminal:
-- insert a few rows first
INSERT INTO db.user (id, name, ts) VALUES (4, 'rock',  CAST('2022-07-02 01:11:20' AS TIMESTAMP));
INSERT INTO db.user (id, name, ts) VALUES (5, 'jack',  CAST('2022-07-02 05:22:10' AS TIMESTAMP));
INSERT INTO db.user (id, name, ts) VALUES (6, 'mars',  CAST('2022-07-02 08:23:20' AS TIMESTAMP));
INSERT INTO db.user (id, name, ts) VALUES (7, 'cloe',  CAST('2022-07-02 08:44:50' AS TIMESTAMP));
INSERT INTO db.user (id, name, ts) VALUES (8, 'smith', CAST('2022-07-02 10:52:20' AS TIMESTAMP));
INSERT INTO db.user (id, name, ts) VALUES (9, 'piec',  CAST('2022-07-02 11:24:30' AS TIMESTAMP));
INSERT INTO db.user (id, name, ts) VALUES (10, 'vovo', CAST('2022-07-02 12:00:20' AS TIMESTAMP));


-- delete some rows then
DELETE FROM db.user where id = 1;
DELETE FROM db.user where id = 4;
DELETE FROM db.user where id = 7;


-- query the table
SELECT * from db.user;
Check self-optimizing
As new data is written to the table, Amoro will automatically trigger self-optimizing on the table.
Click on Tables in the sidebar, select the test table to enter the table details page, and switch to the Optimizing tab, where you can see all the self-optimizing tasks on the table.
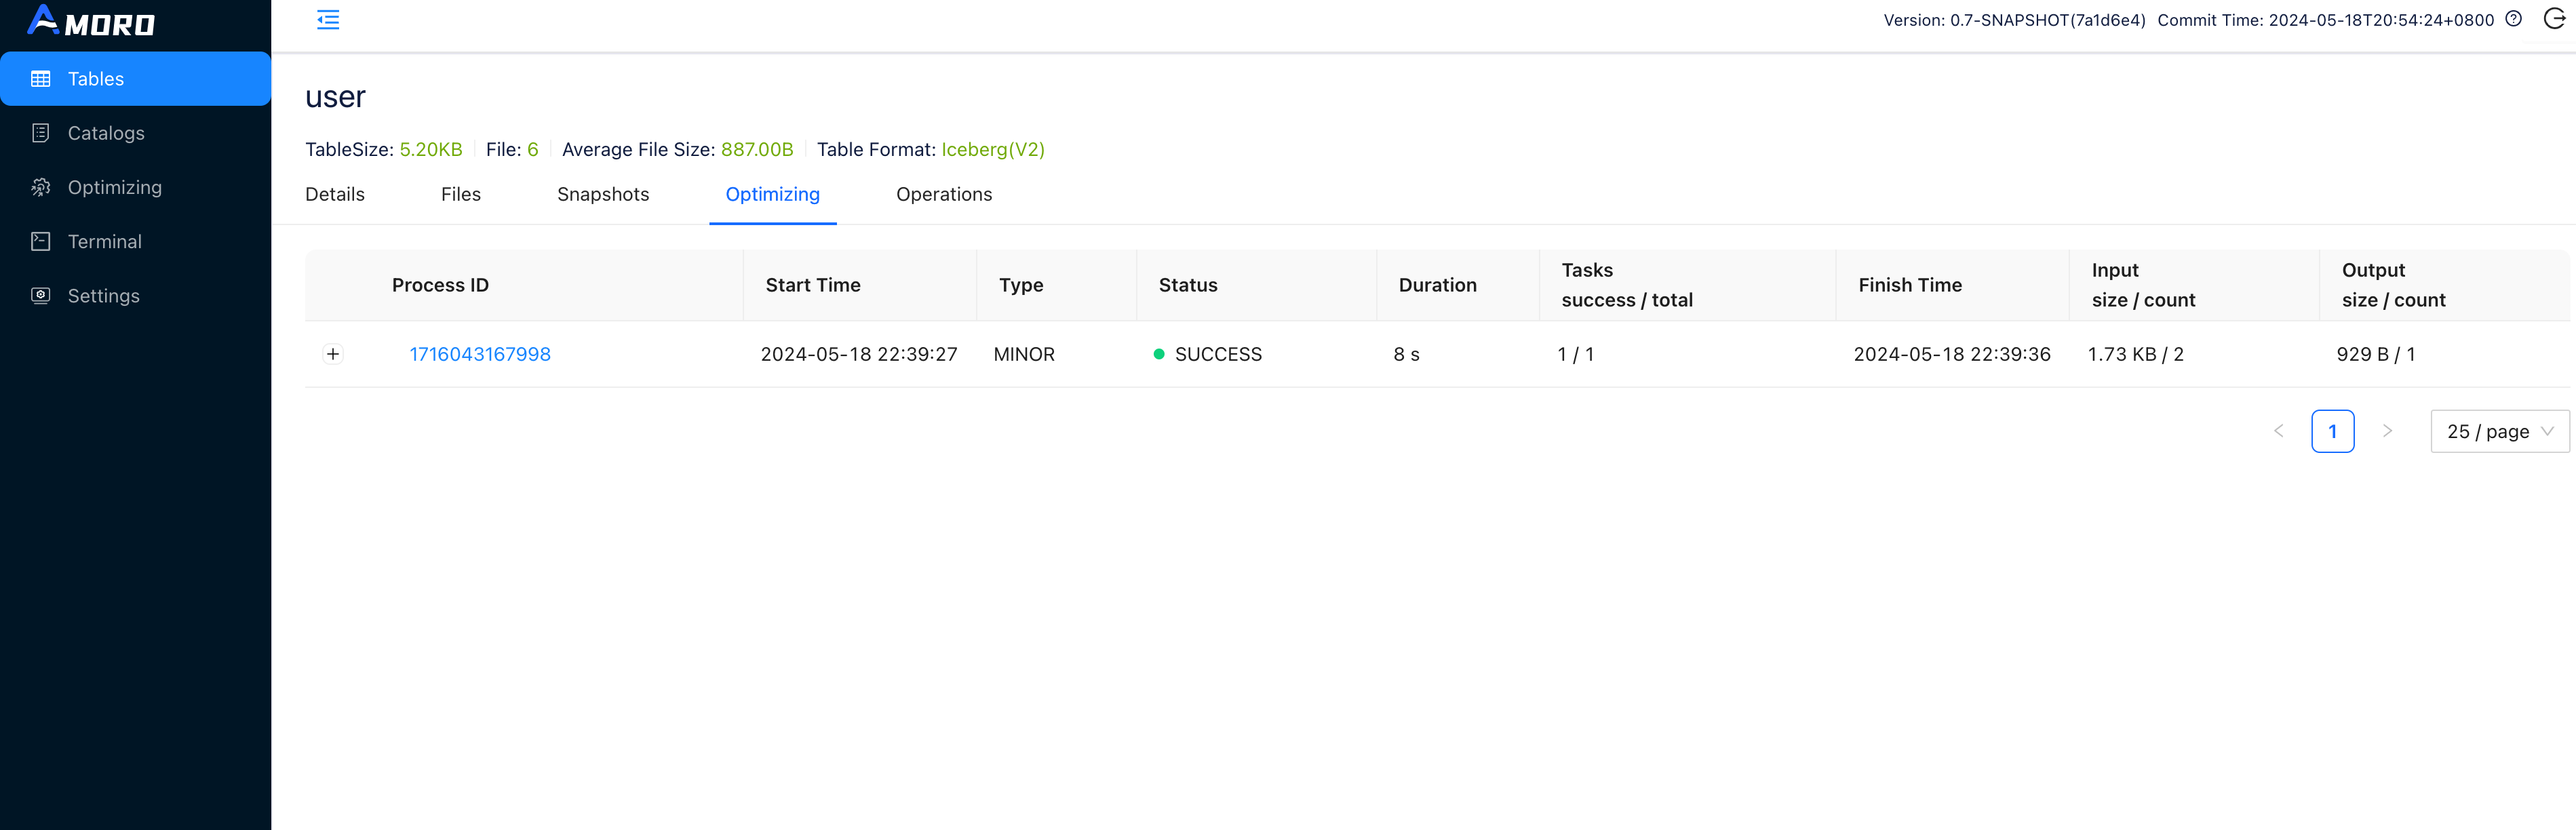
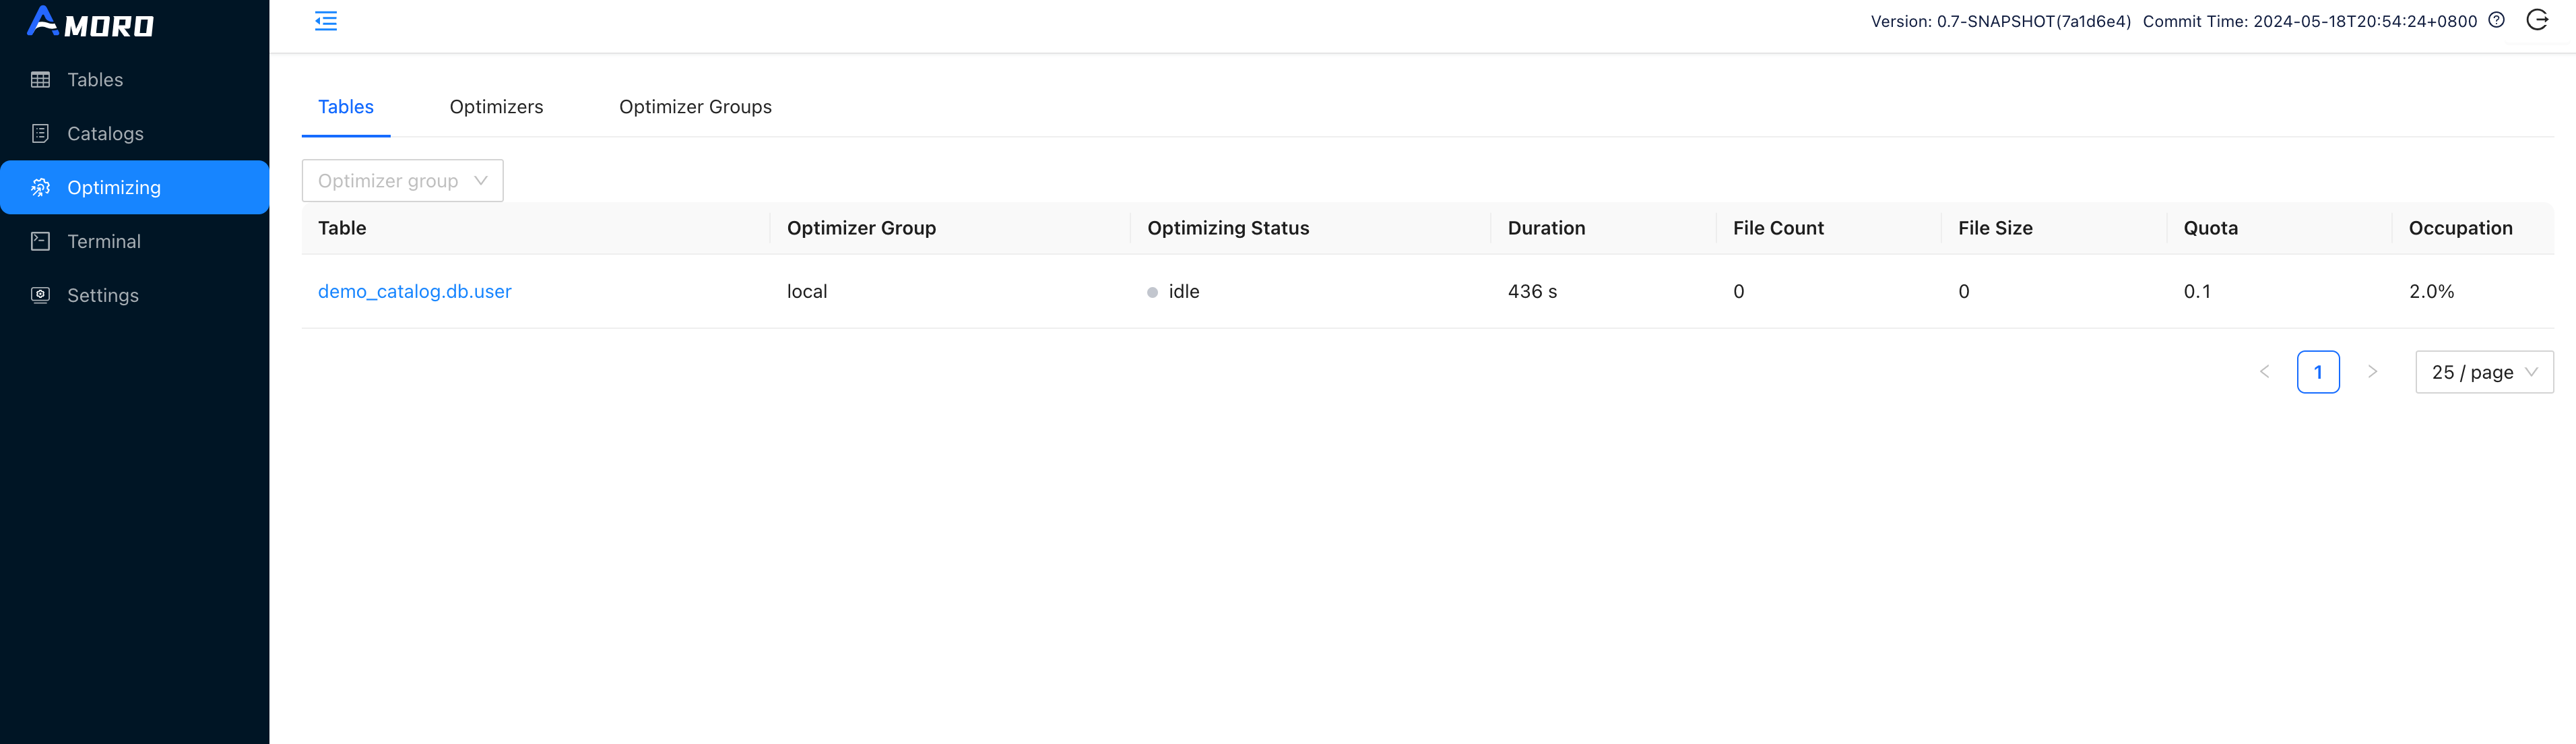
You can also enter the Optimizing page through the sidebar to view the current optimizing status of all tables.
For more information on Self-Optimizing, please refer to: Self-optimizing
docker-compose down